[Part 2] NAScrate design
You might want to read these in order. This article is part of NAScrate series. Other articles in the series:
- [Part 1] NAScrate - the budget for the budget NAS
- [Part 2] NAScrate design
- [Part 3] Building NAScrate
- [Part 4] NAScrate files and final thoughts
You can also see all articles in NAScrate series or subscribe to the RSS feed for this series.
Prototyping🔗
Is this even feasible? There's one way to find out! Well.. there's probably more than one way, but here's what I did. First thing I tried was to model and print rough miniature models of all the components I need to fit inside the case. (which I've printed as well) This gave me general idea, how to put the components in, but it's not accurate enough to see if we have enough free space around the components to actually fit in mounting brackets and all that other stuff. As we'll see later on, in reality there's just few millimeters gap between the components, so anything in the 1:10 scale just isn't going to be accurate enough.
Still though, having physical objects gave me a quick way of moving stuff around and see if I'm on the right track or way off. At that scale, the actual print time is mere minutes, so well worth the time spent.
On top of that, miniature Knaggling crate is actually quite cute, so it ended up being used as a toy crate for my son's toy trucks.
OnShape modeling🔗
Next step was to model everything properly (including the crate and brackets) in OnShape and try to assemble it there. This is definitely more involved that the previous estimate phase, but we're now getting down to millimeters and we can also see, how is the future product going to look like.
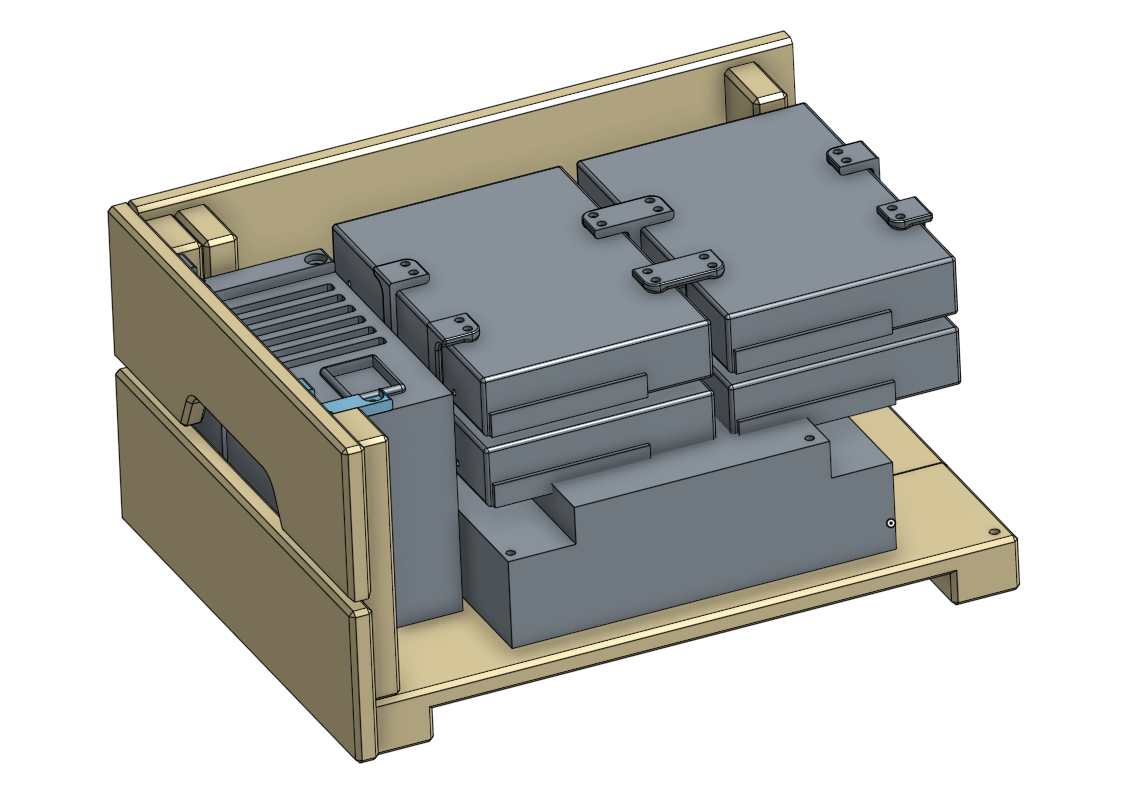
The screen shot shows you the final layout, but it took a while to actually get there. In the beginning I've just created a simple box-shaped objects representing each component. I've searched the specification for each one (sometimes quite tricky to find actually!) and used the max allowed dimensions to model the component in OnShape. The models don't have to be that detailed, but including rough connector position is definitely a good idea as you generally don't want to have those in tight spaces. (remember, you need some margin for the plugs and to run the cables inside the case)
Going off-specs🔗
Aiming for max dimensions means, that we should be able to use any component that follows the specs. Also it's sort of "worst case" situation, so hopefully in reality we will get some free space here and there. However with this approach, it turned out, that motherboard specification is too generous -especially around CPU heat sink area. It's mere millimeters, but it just won't fit.
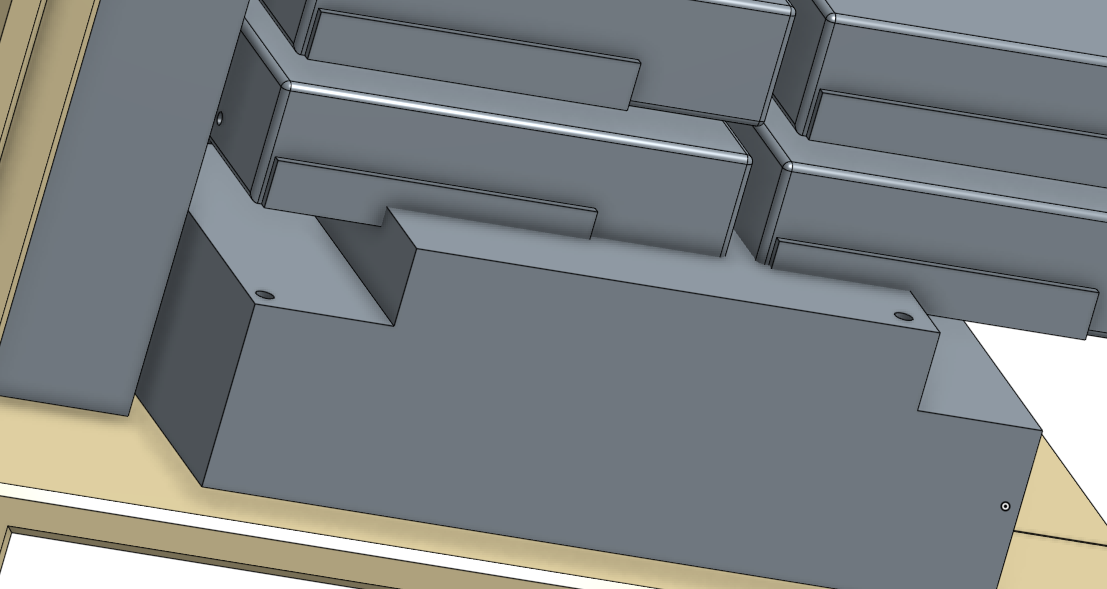
In reality though, only few boards actually use all the available height and most you'll normally find in the shops will actually have much lower profile. (I'm not talking about low profile boards here, these would definitely fit, but are usually quite pricey) So I've decided to break the rule here just once and not follow the specs 100%. It's definitely something to keep in mind when you're shopping around for components, but again: most boards will be just fine.
Test prints🔗
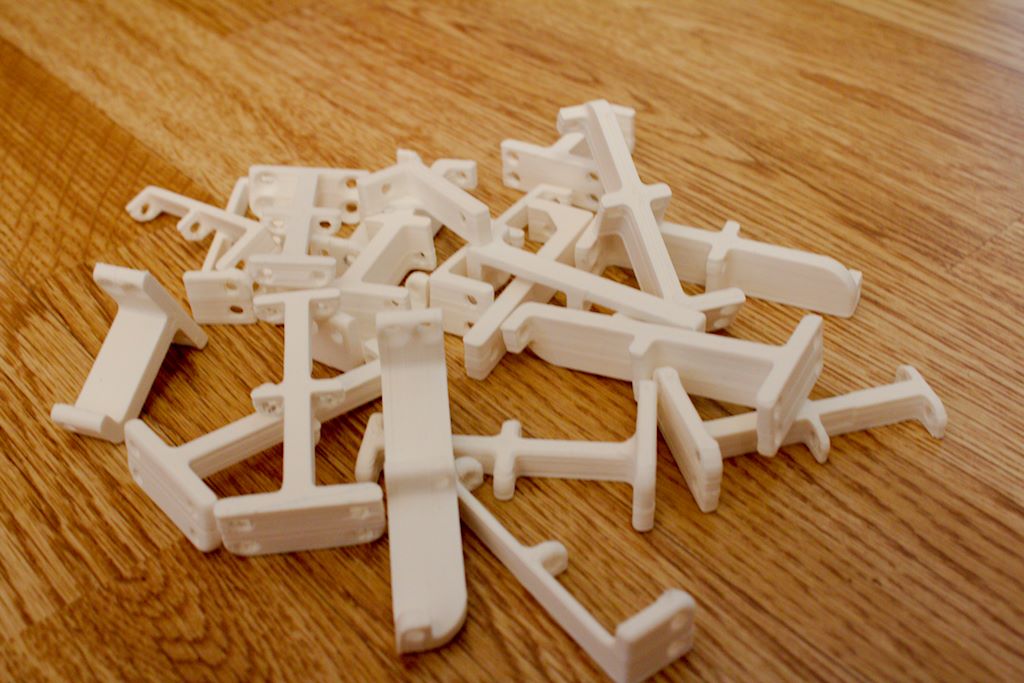
At this stage I've did couple test prints. I've printed out the brackets to see how sturdy they are. (in CAD 3mm feels a bit fragile, but I've learned that in reality even PLA is sturdy enough) I usually find out, that iterating quickly is extremely beneficial in this stage. The first printout looks nothing like the final product. I ended up with huge graveyard pile of models that weren't good enough for one reason or another, wasting hours of print time and few €€€ worth of plastics. But at the same time I've learned quite a bit along the process. Another benefit is, that comparing the first printout with the latest, refined, model is very satisfactory, that alone makes the wasted plastic well worth it.
Test assembly🔗
When I think I'm done with the modeling, it's time for some simple test assembly. I'm not really trying to assembly the whole thing together, it's more like a few screws put here and there to see if holes are big enough, margins wide enough and whether actual components follow the specs. This is usually a time, when I realize that even more changes are needed. So far it seems like 50% of design iterations are actually done in this phase. It probably shows, that I'm not a pro designer here. Hopefully it'll get better with extra experience. So again, more wasted plastics and more print time. And again, more experience.
Final assembly🔗
I will go into details of that later on. For now I'll just mention, that the final assembly ended up needing few more iterations. At that stage it might be a bit frustrating - I'm so close to the final product, but I have to go back to the drawing boards yet another time. At the same time, the whole thing is starting to look like what we're aiming for, so the motivation is definitely there. Again, bit more wasted plastics, bit more wasted print time. +1 to EXP
I'll write a whole separate blogpost about the actual assembly, don't worry, there's much more details (and photos) incoming.
Final words🔗
I have to admit, I've started to look at things differently yet again. When you look just right at something, you can see how it evolved. You can see the weird curve, that probably wasn't there before, but it turned out being quite important.
You can see the imperfections, obvious design mistakes. But you can appreciate those as well. Sometimes it feels like before - you're wondering how could somebody make such obvious design mistake? How stupid one has to be to do such thing? But then you look at your first prototype and the latest model. All the issues, that you've now fixed and they were all obvious now that you see them. The crappy design deserves its own appreciation - it's a great way to learn from mistakes of others, even more so, than good design is.
It's a very humbling experience.
This article is part of 3dprinting category. Last 4 articles in the category:
- [Part 4] NAScrate files and final thoughts
- [Part 3] Building NAScrate
- [Part 1] NAScrate - the budget for the budget NAS
- Why would you want 3D printer?
You can also see all articles in 3dprinting category or subscribe to the RSS feed for this category.