[Part 4] NAScrate files and final thoughts
You might want to read these in order. This article is part of NAScrate series. Other articles in the series:
- [Part 1] NAScrate - the budget for the budget NAS
- [Part 2] NAScrate design
- [Part 3] Building NAScrate
- [Part 4] NAScrate files and final thoughts
You can also see all articles in NAScrate series or subscribe to the RSS feed for this series.
So our build is now done. I'm still thinking about making some improvements, like a proper ports panel or some air circulation control, but it's already very usable NAS box. The only missing part is installing something like freeNAS or some other user friendly NAS OS, but there's a ton of howtos out there, so I'm not going to create another one.
Feel like building your own NAScrate? Here are all the files you'll need.
The parts🔗
First the *.stl files for your printer. You can find them all in the parts.zip file. All parts can be printed without any supports. Depending on your print area, you might be able to fit them all in one print. (though you probably won't save much time doing so)
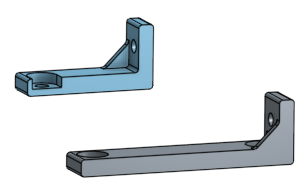
Drive mount🔗
Inside, you'll find three drive mount parts. If you plan to only deploy two drives in one column, you can only print left and right part, but most likely you'll want to print all of them. You'll need two of each. (front and back)

PSU mount🔗
Left and right part. You just need one of each.
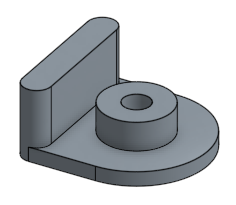
Motherboard standoffs🔗
These are just standoffs that keep the motherboard slightly above the crate surface. Depending on your motherboard, you'll need multiple of these - most likely four for each corner.
Drive mount assembly map🔗
There's layout map that you can print out on your regular printer to help you put individual parts for the drive assembly in place. These are two versions that depend on the drives you plan to use.
The narrow.pdf should be used in case you want to install your drives using the back and middle bottom holes. (some drives have just these two, the specification requires at least one of the holes to be present, so technically there might be no "middle" hole)
The wide.pdf should be used if you are going to use the front and back hole.
Make sure you print these without any scaling. They are provided in the ISO A4 page format, keep that in mind if you use letter sized paper. The prints should fit on both paper sizes with scaling turned off.
Final thoughts🔗
Well that was easier, than I expected.. ..said no one. 😄 It actually took me few months from the initial idea to the completed running device. Hopefully I've saved you most of the effort if you want to follow me. With the files and parts prepared, the actual build is probably a matter of afternoon. (depending on the printing time required) Picking up the proper components might be another few hours. (especially if the budget is tight) All things considered, it's a decent network storage for about €120 and a day of actual work.
Not bad, huh?
If you decide to build your own, let me know how it went. If you spotted any issues or have a problem finishing your build, just ping me, I'll do my best to help.
License🔗
The NAScrate design and files are provided under Creative Commons Attribution-ShareAlike 4.0 International License. Please link back to this page if you want to share your own design based on files provided by me.
This article is part of 3dprinting category. Last 4 articles in the category:
- [Part 3] Building NAScrate
- [Part 2] NAScrate design
- [Part 1] NAScrate - the budget for the budget NAS
- Why would you want 3D printer?
You can also see all articles in 3dprinting category or subscribe to the RSS feed for this category.