Migration to cold storage with Rustic
You might want to read these in order. This article is part of Glacier series. Other articles in the series:
- Economics of cold storage with Rustic
- Migration to cold storage with Rustic
You can also see all articles in Glacier series or subscribe to the RSS feed for this series.
In the previous article I've looked at economic side of using cold storage for Rustic backups. In this part I'll look at technical side of things - setting up the cold storage, migrating existing repository to this backend and restoring from backup.
AWS setup🔗
The AWS side of this is pretty standard and I won't go into many details here. If you plan to store backups in AWS I assume, you're somewhat familiar with the ecosystem.
Buckets 🪣🔗
We need to create two S3 buckets. Use Terraform, AWS console or whatever you're used to. Some hopefully helpful hints:
- Names are irrelevant, pick something that makes sense to you. Having hot or cold somewhere in name will help avoiding confusion.
- It's very much good idea to disable public access to the buckets which should be the default now.
- For the cold bucket enabling versioning is a good way to add a bit of resilience for the backups. With typical backups you're very unlikely to actually prune repository or delete any large objects. So enabling versioning is effectively free insurance against data loss due to malicious actor or human error - assuming the person does not have rights to also delete versions, which is reasonable as one does not need that to write backups. For extra protection consider adding MFA delete protection.
Policy and credentials🔗
Let's create policy that will let us backup data.Replace backup (hot bucket) and backup-cold (cold bucket) with the names of your buckets.
{
    "Version": "2012-10-17",
    "Statement": [
        {
            "Effect": "Allow",
            "Action": [
                "s3:GetBucketLocation",
                "s3:ListBucket"
            ],
            "Resource": [
                "arn:aws:s3:::backup",
                "arn:aws:s3:::backup-cold"
            ]
        },
        {
            "Effect": "Allow",
            "Action": [
                "s3:DeleteObject",
                "s3:GetObject",
                "s3:RestoreObject"
            ],
            "Resource": [
                "arn:aws:s3:::backup/*",
                "arn:aws:s3:::backup-cold/*"
            ]
        },
        {
            "Effect": "Allow",
            "Action": [
                "s3:PutObject"
            ],
            "Resource": [
                "arn:aws:s3:::backup/*"
            ]
        },
        {
            "Effect": "Allow",
            "Action": [
                "s3:PutObject"
            ],
            "Resource": [
                "arn:aws:s3:::backup-cold/*"
            ],
            "Condition": {
                "StringEquals": {
                    "s3:x-amz-storage-class": "DEEP_ARCHIVE"
                }
            }
        }
    ]
}
Notice that for cold storage we only allow PutObject operation with appropriate storage class - this will prevent us from storing terabytes of data in much more expensive tier. In theory we could implement something similar for hot bucket, but for the amount of data involved I opted for leaner policy.
Attach this policy to a role or directly to a user. I would recommend creating separate user just for backups without console access. Then generate access key for Rustic to use. Store these securely, we will use them later. Now we should be in position to actually start uploading data, so let's move to migration.
Migration to cold storage🔗
We're going to use the rustic copy sub-command with added sprinkle of multi-tiered storage as a target. I assume, you have rustic installed already.
Configuration🔗
The easiest approach is to create temporary configuration for Rustic just for this migration. The source configuration is pretty plain affair, there are just few special settings related to Wasabi OpenDAL configuration, adapt this to your situation:
[repository]
repository = "opendal:s3"
password="hunter2"

[repository.options]
bucket = "old-rusty-backup-bucket"
root = "/"
endpoint = "https://s3.eu-central-1.wasabisys.com"
region = "eu-central-1"
access_key_id="AKIAIJOYCQDFPQJ72"
secret_access_key="xGz7vJmhSdNrTb45ZPkLfM8B1jKqJpqoWgPxSsH"
The options are pretty self-explanatory. I recommend storing the passwords in the file for the duration of the migration. You'll be using two sets of credentials and this is the best way to avoid confusing mistakes. You can store the file in ~/.config/rustic/migration.toml so that you have to pick the migration profile with -P flag. After you're done, you can remove the file and perhaps rotate the credentials if you'd rather handle them in more safer way in the future.
If you use other storage provider, OpenDAL docs should help you there, they also provide some examples for 3rd party S3 providers.
The above should be enough configuration to give us the repository stats with rustic repo-info -P migration.
Next we need to add target to the same configuration file. Rustic can actually have multiple targets configured, but don't let that confuse you - we actually want single target with multiple S3 buckets:
[[copy.targets]]
repo-hot = "opendal:s3"
repository = "opendal:s3"
password = "hunter3"

[copy.targets.options]
bucket = "backup-cold"
default_storage_class = "DEEP_ARCHIVE"
region = "eu-west-1"
root = "/"
access_key_id="AKIAIJOYCQZMNBPE"
secret_access_key="xGz7vJmhSdNrTb45ZPkLfM8B1jKqJpqoWgPxUuH"

[copy.targets.options-hot]
bucket = "backup"
default_storage_class = "STANDARD"
region = "eu-west-1"
root = "/"
access_key_id="AKIAIJOYCQZMNBPE"
secret_access_key="xGz7vJmhSdNrTb45ZPkLfM8B1jKqJpqoWgPxUuH"
Few important details:
- The target repository password can (and perhaps should) be different. The contents are going to be re-encrypted anyways.
- Make sure you use the correct default storage type for both buckets. You don't want to end up with hot data in deep archive or paying for terabytes of regular storage tier. (The policy we wrote earlier should prevent the costly mistake)
- For the
bucketoption, provide names of your buckets that we created earlier. - Note that you don't have to use the same access key for hot and cold bucket, but you certainly can. (for example if you use different provider for one)
Running the migration🔗
Let's migrate single snapshot first:
# Provide your snapshot id bellow
rustic copy -P migration --init ca3d93ee
Perhaps pick one of the smaller backups initially. Also note the --init parameter. This is to initialize the destination repository with the same parameters as the source. Otherwise next backup would likely not deduplicate properly wasting a lot of space. Se documentation for details why this is necessary.
As it's running, perhaps double check that the objects are created correctly. Web interface should show correct storage class of objects in each bucket.
Once we're happy with the result, we can kick off full sync (or if desired, limited one with --filter-host, --filter-label, --filter-paths or --filter-tags if you don't intend to move the rest)
rustic copy -P migrationPerhaps run the command above in tmux, screen or with nohup, because it's likely going to run for a while. Rustic will skip already present blocks (like our earlier single snapshot run), so you should be able to restart it if needed and it should just continue copying the rest.
Using multi tiered repository going forward🔗
Once migrated, we need to make the multi tiered repository our main one. In the config file we essentially need to drop the previous repository settings and replace it with copy.targets as this is our main repository now:
[repository]
repo-hot = "opendal:s3"
repository = "opendal:s3"

[repository.options]
bucket = "backup-cold"
default_storage_class = "DEEP_ARCHIVE"
region = "eu-west-1"
root = "/"

[repository.options-hot]
bucket = "backup"
default_storage_class = "STANDARD"
region = "eu-west-1"
root = "/"
I've dropped the credentials from the file. You could provide them as AWS_ACCESS_KEY_ID, AWS_SECRET_ACCESS_KEY and RUSTIC_PASSWORD environment variables just for the backup run for example. Or leave them in the file. There are options, do what makes most sense to you.
How to restore?🔗
Rustic needs two more bits of configuration to restore - it needs to be told how to restore the objects in cold storage and it needs to be told how long to wait before attempting to read the restored objects.
For that we need to extend the repository settings a bit:
[repository]
repo-hot = "opendal:s3"
repository = "opendal:s3"

warm-up-command = "/etc/rustic/warmup.sh %id"
warm-up-wait = "48h"

# ... rest of the file ommited ...
As you can see, warm-up-command runs a warmup.sh script. The %id will be replaced with pack ID. We will need to provide a script, that will take that ID and convert it to restore-object call. For that we need to know a bit about repository file structure.
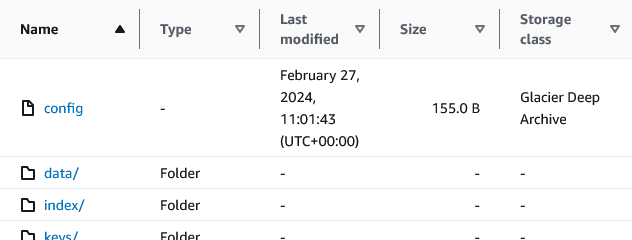
The packs are stored in S3 in a following tree structure:
data/<first two characters of ID>/<ID>So our script needs to translate the ID into path and issue restore command. Here's how the script could look like:
#!/bin/bash

aws s3api restore-object \
  --restore-request '{"Days":5,"GlacierJobParameters":{"Tier":"Bulk"}}' \
  --region eu-west-1 \
  --bucket backup-cold \
  --key "data/${1:0:2}/${1}"
The above script assumes that it'll get pack ID as first ${1} parameter, which is how we configured Rustic earlier. Then it runs aws s3api restore-object command. Few things to note:
- You need aws cli tool available for
warmup.shscript to execute- You also need either valid aws profile with credentials configured or you can set
AWS_ACCESS_KEY_IDandAWS_SECRET_ACCESS_KEYenvironment variables before runningrustic restorecommand. Theawscommand will pick it up when doing the request.
- You also need either valid aws profile with credentials configured or you can set
- There are parameters for
--restore-requestyou might want to tune:Daysdefines the number of days for which objects should be kept restored. Keep in mind that you pay standard tier storage prices for the restored objects while they are restored.Tierdefines the priority of the restore job.Bulkbeing the cheapest one (depending on region about$0.025per 1k restore requests and$0.003per GB restored) andStandardthat's about 5x as expensive.
- Adapt the region and bucket name to point to where your cold bucket is located
The warm-up-wait then instructs Rustic to wait for the restoration to complete before attempting to read the data. Rustic itself does not check restoration status by default, so it simply waits for the time specified — though see the update note below for a smarter alternative.
This is where the Tier we previously specified matters. From the AWS docs:
[Standard retrievals will..] typically finish within 12 hours [..and Bulk retrievals will..] typically finish within 48 hours for objects stored in the S3 Glacier Deep Archive storage class
So depending on your restore request setting the warm-up-wait to 12h or 48h is most reasonable. AWS might restore some objects faster than that, but we can't really rely on that.
Update (2026): We actually can now! There's
warmup-s3-archives, a program designed to plug into rustic as thewarm-up-command. Combined with extra AWS infrastructure (SNS/SQS), it receives a signal for each pack as it finishes warming up and tells rustic exactly when all packs are ready. The rustic cold storage docs explain how to set this up. The bellow steps are a bit outdated, but perhaps still useful.
Once you are set up, you can run the restore command as usual. You should see output like this:
...SNIP...
[00:00:00] reading index...               ¦¦¦¦¦¦¦¦¦¦¦¦¦¦¦¦¦¦¦¦¦¦¦¦¦¦¦¦¦¦¦¦¦¦¦¦¦¦¦¦          4/4
[00:00:00] getting snapshot...            ¦¦¦¦¦¦¦¦¦¦¦¦¦¦¦¦¦¦¦¦¦¦¦¦¦¦¦¦¦¦¦¦¦¦¦¦¦¦¦¦          0
[INFO] getting snapshot...
[00:00:00] collecting file information...
Files:  1 to restore, 0 unchanged, 0 verified, 0 to modify, 0 additional
Dirs:   0 to restore, 0 to modify, 0 additional
[INFO] total restore size: 38.2 MiB
[00:00:06] warming up packs...            ¦¦¦¦¦¦¦¦¦¦¦¦¦¦¦¦¦¦¦¦¦¦¦¦¦¦¦¦¦¦¦¦¦¦¦¦¦¦¦¦          4/4
[00:00:00] waiting 48h...
..and now we wait. ⏱️ The command should eventually continue and restore the files, which it does..
[48:00:00] waiting 48h...
[00:00:02] restoring file contents...     ¦¦¦¦¦¦¦¦¦¦¦¦¦¦¦¦¦¦¦¦¦¦¦¦¦¦¦¦¦¦¦¦¦¦¦¦¦¦¦¦  38.17 MiB/38.17 MiB  16.74 MiB/s  (ETA 0s)
[00:00:00] setting metadata...
restore done.
To speed things a little in case AWS is faster than promised, it's also possible to let Rustic issue the restore requests and then cancel the command and wait for the object restoration to finish. Then as soon as it does rerun Rustic without the warm-up configuration or by overriding the command with some no-op like --warm-up-command="true %id" and setting the wait to zero with --warm-up-wait=0s.
There is some discussion here. Hopefully in future Rustic will be able to handle this more elegantly, but for now this will do. It is very clearly a new feature that didn't have much time to develop and it still has some sharp edges.
As it is now, it probably makes most sense to add warm-up configuration once you actually need to restore something as specific situation will probably drive your decision in terms of restore parameters. Alternatively just set it ad-hoc with --warm-up-command and --warm-up-wait.
Fin🔗
That's it. We now have our backups in that cost effective ice-cold bucket. ❄️ Are the potential cost savings worth having to deal with the extra complexity?
That's up to you to decide.
This article is part of Cloud category. Last 2 articles in the category:
You can also see all articles in Cloud category or subscribe to the RSS feed for this category.