VFIO GPU pass-through on Dell R710
There’s a plenty of articles out there on VFIO GPU pass through out there, so I’ll skip many of those details here to let us focus on stuff that’s somewhat specific to Dell R711.
Before we get to the nitty gritty details of the whole setup, just a short warning: If the GPU pass through is the only use case you want to cover, starting with Dell R710 is absolutely not the way to do it.
Here’s why:
-
You have very limited options in terms of which GPU you can use:
-
The PCIe slot in R710 is (most likely) going to be x8 size, this requires either physical modification of the slot or some form of adapter as GPUs generally require x16 slots.
-
There’s no easily accessible power for the GPUs that also require additional power source. (which is most of the more powerful GPUs)
-
Cooling can be a problem. R710 just barely has enough space for 2 PCIe slots. Some GPUs Use that space 100% and the fan air intake can be blocked by the server lid.
-
-
This server is quite old and the
FCLGA1366socket can only host older Xeons that don’t really have great single thread performance. This is not ideal for gaming. Most games can’t use multiple cores effectively, and even if they could you’ll be limited to up to six cores of one CPU. This is due to NUMA architecture where spanning processes across NUMA nodes would lead to increased latency.
The slightly newer Dell R720 would fit the GPU pass-through setup a bit better, because most of the above limitations no longer apply, but for me R710 fulfilled the main purpose and GPU accelerated VM is really just a side experiment.
With all this out of the way, let’s get to the setup:
Choosing GPU🔗
With the constraints listed above, I’ve decided to use an PCIe x8 to PCIe x16 adapter, so I wouldn’t have to physically modify the slot. (this is fairly easy procedure and the raiser boards are quite cheap if you mess up, so it’s definitely a way to do it, I just didn’t want to) This limited my options to low profile GPU (already quite massive constraint) with no extra power required. (this rules out almost all gaming-grade GPUs)
Eventually I settled on Nvidia GTX 1050 2GB LP. This is one of the most powerful GPUs that is low profile and does not require extra power source. There was an 4GB ti option that can provide little bit extra performance, but I felt like the Xeon can’t really drive the 2GB version to 100% usage, so the extra investment didn’t make sense. Couple months later, GTX 1650 would also be an option - again slightly more powerful GPU, but the Xeon probably won’t utilize it 100% most of the time.
Physical installation🔗
This was somewhat simple - just plug the adapter into the slot and then into the adapter. Oh wait, the PCIe slot bracket no longer fits into the slot due to the offset the adapter created. Fortunately with 3D printer it only required a bit of CAD design to print out suitable replacement:
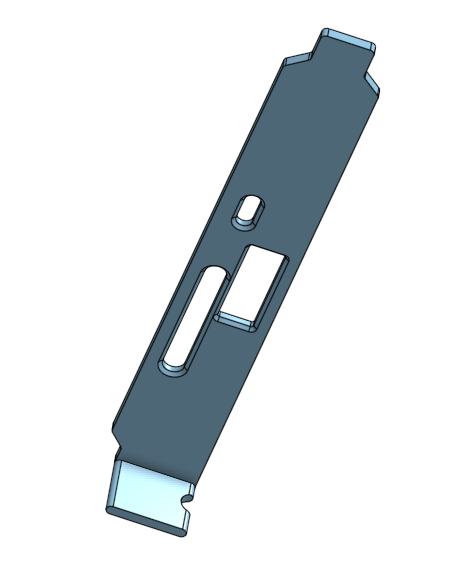
Note, that I left a hole for HDMI dummy plug. I planned to stream games over network without anything plugged directly into the server. The HDMI dummy simulates connected monitor as GPUs like to turn off when there are no screens connected.
Without 3D printer, this would require some DIY work to hold the GPU inside the server firmly, but it shouldn’t pose much problem either way.
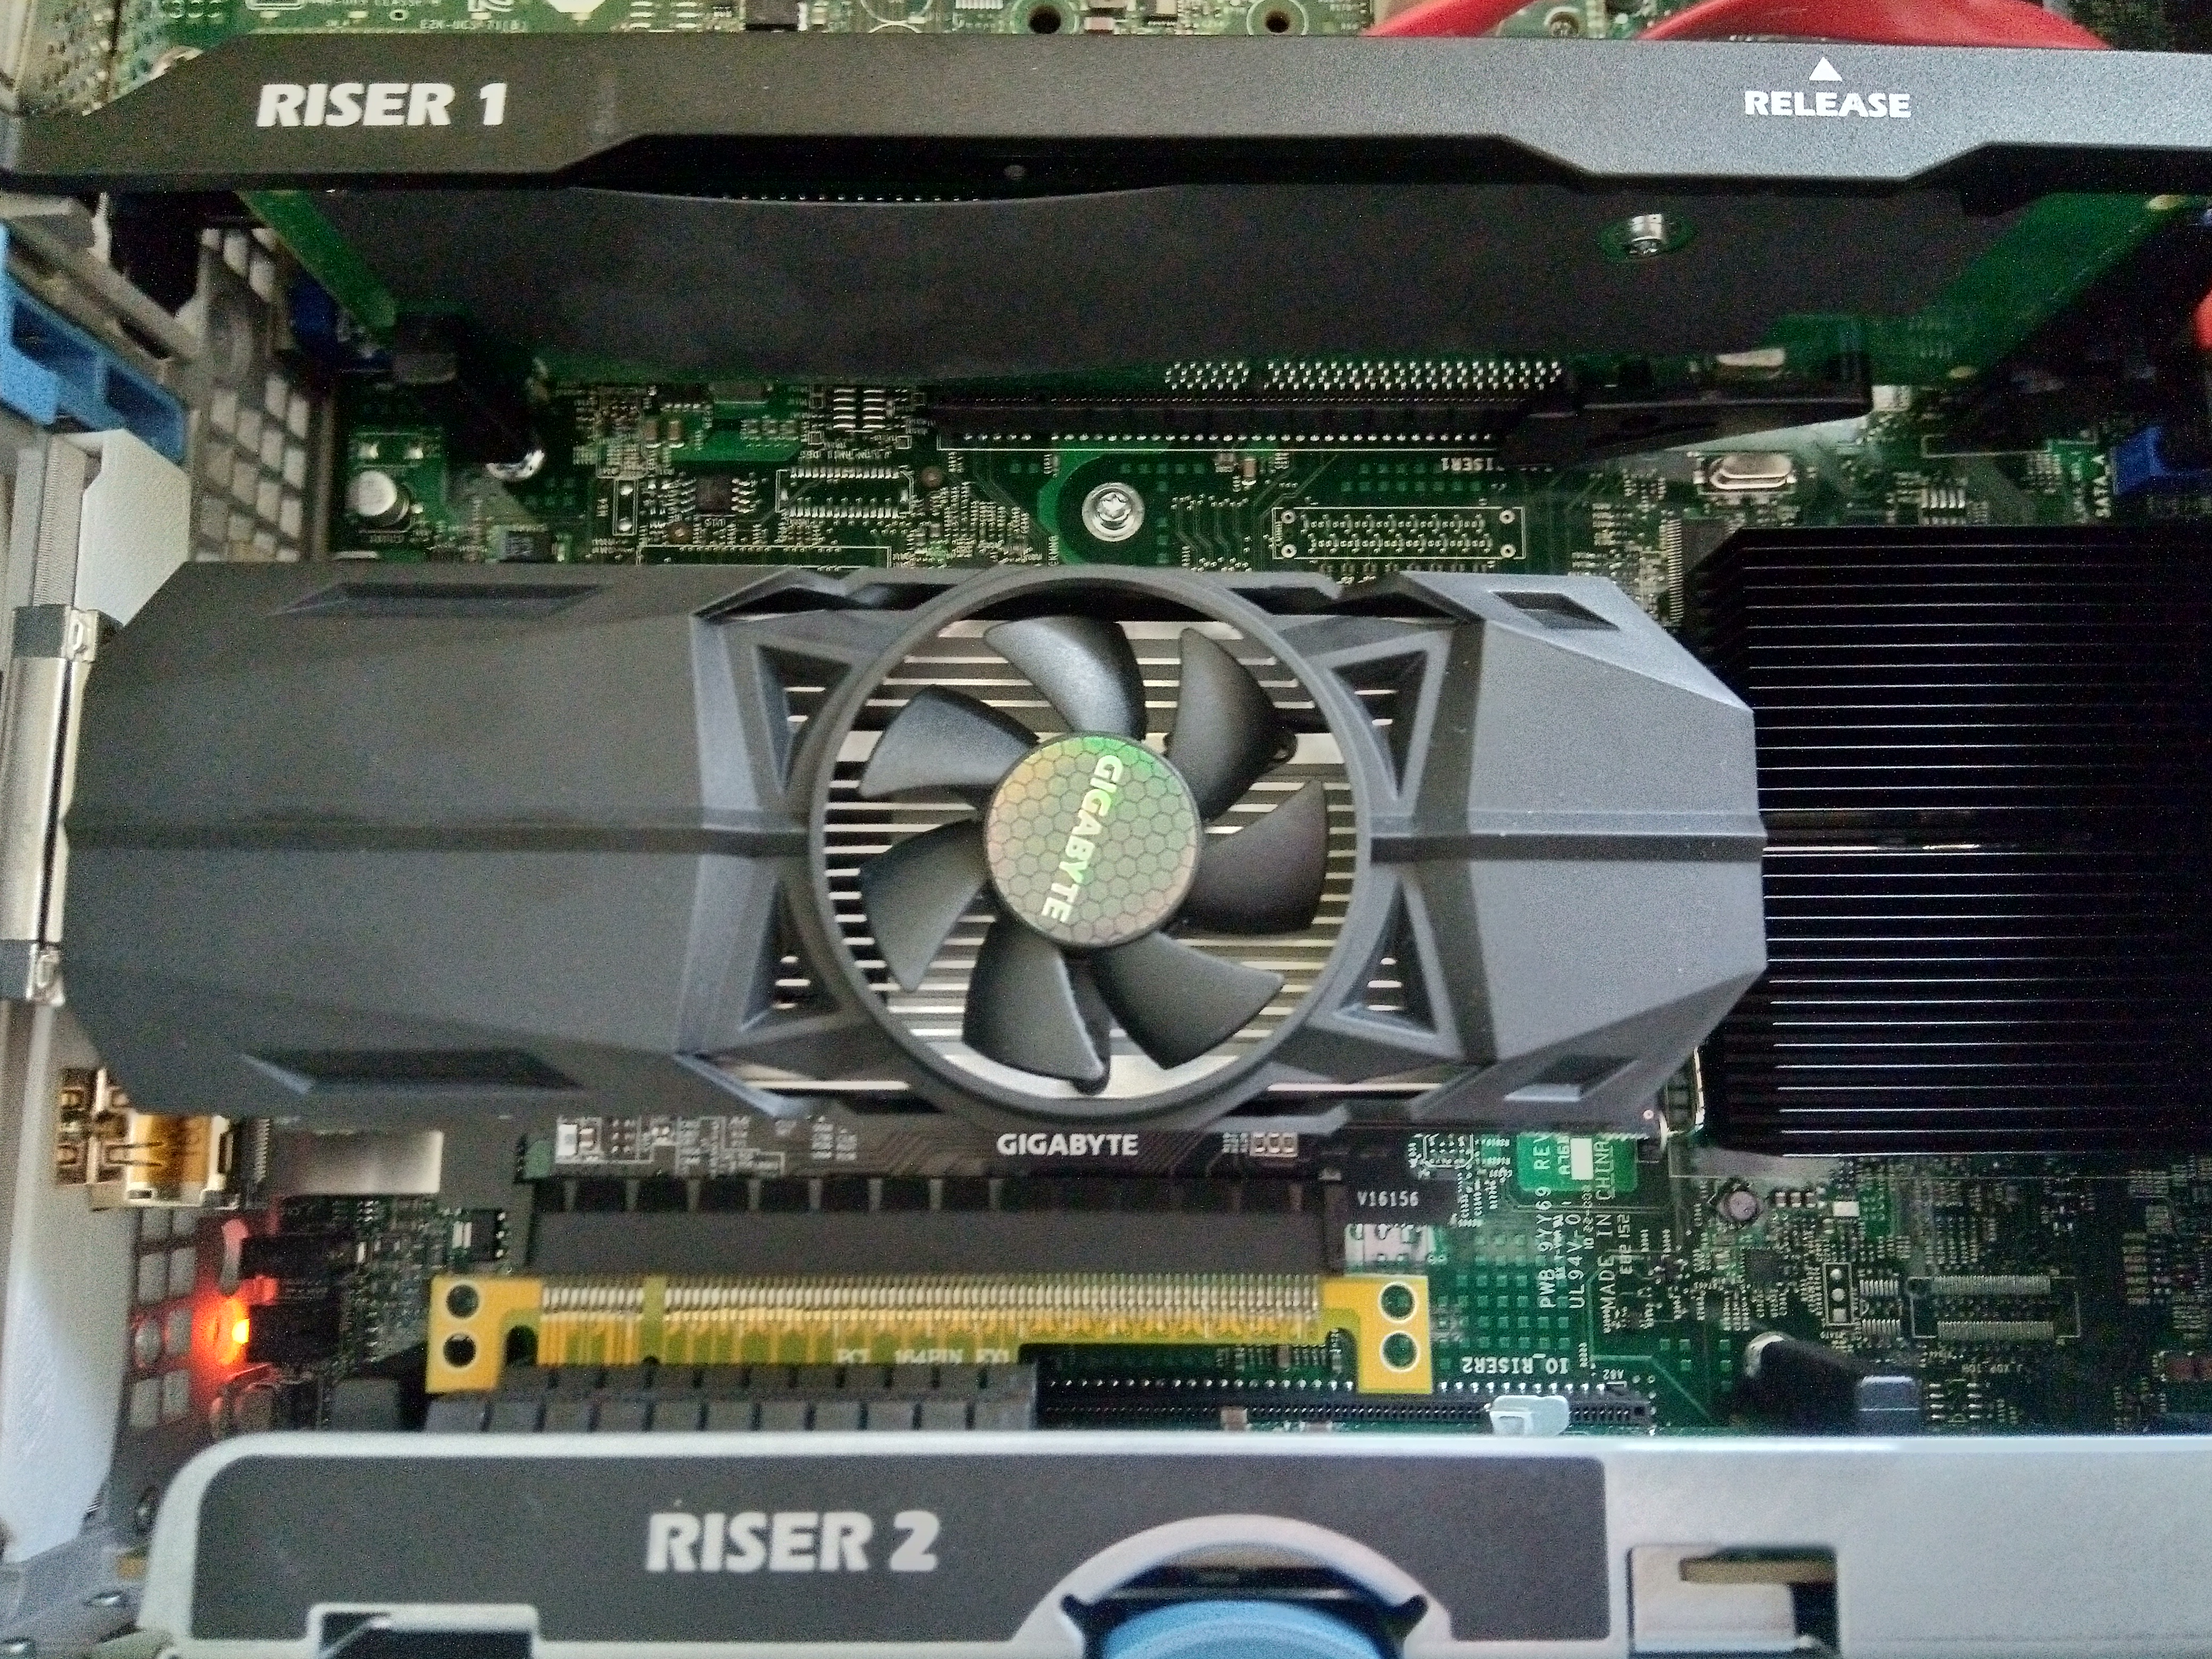
Here’s how the card looks when it’s installed:

Setting up VFIO🔗
There’s a bunch of howtos out there on how to set up VFIO and pass GPU through to the VM. I found this tutorial (and other articles in the series) especially helpful. I didn’t follow it thoroughly, but it served as good checklist on what needs to be set up.
In my case I decided to keep things simple and I ended up with these
kernel parameters in /etc/default/grub:
# grep GRUB_CMDLINE_LINUX_DEFAULT /etc/default/grub
GRUB_CMDLINE_LINUX_DEFAULT="intel_iommu=on modprobe.blacklist=nouveau vfio_iommu_type1.allow_unsafe_interrupts=1 vfio-pci.ids=10de:1c81,10de:0fb9 hugepages=12400"
These were added over couple reboots and the details will be specific to your hardware, but let me explain:
intel_iommu=on🔗
Enable IOMMU. This is the mechanism that will later allow us passing PCIe device (GPU) to a VM. You need to do this first to see how will the IOMMU groups work with your specific hardware. This is Xeon based server grade hardware, so the grouping should be actually quite good.
And it really was. This script will show you group mapping on your server:
#!/bin/bash
shopt -s nullglob
for d in /sys/kernel/iommu_groups/*/devices/*; do
    n=${d#*/iommu_groups/*}; n=${n%%/*}
    printf 'IOMMU Group %s ' "$n"
    lspci -nns "${d##*/}"
done;
I ended up with GTX 1050 (GPU and audio controller for HDMI sound) in its own group:
IOMMU Group 17 06:00.0 VGA compatible controller [0300]: NVIDIA Corporation GP107 [GeForce GTX 1050] [10de:1c81] (rev a1)
IOMMU Group 17 06:00.1 Audio device [0403]: NVIDIA Corporation GP107GL High Definition Audio Controller [10de:0fb9] (rev a1)
Note the PCIe IDs near the end of the lines. We will use those later.
vfio_iommu_type1.allow_unsafe_interrupts=1🔗
I had to use this, because my HW wouldn’t support vfio-based device assignment without it. It is sort of unsafe and allows certain types of attacks using MSI-based interrupt, so do not use this unless the pass-through fails and the error message explicitly tells you to enable this feature. I’m only running VMs that I personally can trust, so this is not a huge concern, but if you plan to use the server to host VMs where individual owners do not trust each other, definitely avoid this.
modprobe.blacklist=nouveau🔗
Normally nouveau (opensource Nvidia GPU driver) will grab the GPU during boot to let host system use it. In my case I planned to use on-board Matrox card as primary VGA card for host, so to avoid nouveau taking over the device, I just blacklisted it. (this would prevent any other nvidia GPU from working, but I only have the GTX 1050 in the server, so that’s fine)
vfio-pci.ids=10de:1c81,10de:0fb9🔗
Configure vfio module to take over GPU and audio card. (both devices are physically on the GTX 1050 card) This will later let you hand over the device to VM.
The IDs are from the lspci listing above and might differ on different
hardware.
hugepages=12400🔗
This is totally optional, but I recommend it to squeeze out a bit of performance out of your hardware. With this I dedicate portion of RAM for hugepages allocation. KVM can then use it to allocate memory to VM in more effective manner. Note that this memory will no longer be usable by the rest of the system. R710 RAM is generally quite cheap these days, so for me it just makes sense to dedicate couple gigabytes to a VM.
Note that I’m using 2MB page size and I’m telling kernel to allocate 12400 blocks which amounts to about 24GB of RAM. I only need 12GB for my VM, so why allocate more?
R710 has two CPUs (you can run it with one, but why would you buy server with two CPU sockets?) and each CPU has it’s own "allocated" memory. Both CPUs can still access entire RAM, but accessing RAM slots that are not local to the CPU (that are not part of the same NUMA node) comes with some performance hit. To avoid this hit, I’m doing two "tricks":
-
I’m pinning the virtual CPU cores to physical cores on only one of the CPUs (this way entire VM runs in the same NUMA node)
-
I’m allocating hugepages in the same NUMA node to make sure the VM memory access won’t suffer the cross-node performance degradation.
Now the problem with hugepages allocation via kernel parameters is that
it (as far as I could find) won’t let you specify in which NUMA
node should the memory be allocated. I could allocate the memory after
the boot just with echo 6200 > /sys/devices/system/node/node0/hugepages/hugepages-2048kB/nr_hugepages,
but because hugepages require continuous unallocated memory chunks,
chances are that even very early into the boot, there might not be
enough free memory to allocate.
Luckily, kernel will allocate the memory evenly across all NUMA nodes and we have enough spare memory during the boot. (my system has 48GB RAM) So what I ended up doing is to allocate double the RAM and then drop hugepages from the NUMA node I won’t use right after the boot:
/etc/systemd/system/drop-hugepages.service.
[Unit]
Description=Drop numa node1 hugepages
After=multi-user.target

[Service]
Type=oneshot
ExecStart=/bin/bash -c 'echo 0 > /sys/devices/system/node/node1/hugepages/hugepages-2048kB/nr_hugepages'

[Install]
WantedBy=multi-user.target
This works rather well and I end up with 12GB usable hugepages in NUMA node0:
# grep . /sys/devices/system/node/node*/hugepages/hugepages-2048kB/nr_hugepages
/sys/devices/system/node/node0/hugepages/hugepages-2048kB/nr_hugepages:6200
/sys/devices/system/node/node1/hugepages/hugepages-2048kB/nr_hugepages:0
QEMU (libvirt) VM configuration🔗
Again there are lots of good tutorials on how to configure VM, so I’m not going to repeat all that stuff. I’m just going to mention relevant bits of the VM configuration that can be somewhat unique to R710.
I’m only showing relevant part of the configuration. The non-relevant parts were cut out, so if you have more settings in your config, that is probably Okay.
CPU pinning🔗
<cputune>
  <vcpupin vcpu='0' cpuset='0'/>
  <vcpupin vcpu='1' cpuset='12'/>
  <vcpupin vcpu='2' cpuset='2'/>
  <vcpupin vcpu='3' cpuset='14'/>
  <vcpupin vcpu='4' cpuset='4'/>
  <vcpupin vcpu='5' cpuset='16'/>
  <vcpupin vcpu='6' cpuset='6'/>
  <vcpupin vcpu='7' cpuset='18'/>
  <emulatorpin cpuset='10,22'/>
  <iothreadpin iothread='1' cpuset='8'/>
  <iothreadpin iothread='2' cpuset='20'/>
</cputune>
<cpu mode='host-passthrough' check='partial'>
  <topology sockets='1' cores='4' threads='2'/>
</cpu>
As I mentioned earlier, I’m constraining the VM to only use cores
of CPU in one socket. (NUMA node 0) You can see the NUMA pairing with
lscpu:
# lscpu | grep NUMA
NUMA node(s):                    2
NUMA node0 CPU(s):               0,2,4,6,8,10,12,14,16,18,20,22
NUMA node1 CPU(s):               1,3,5,7,9,11,13,15,17,19,21,23
As you can see, in my case all evenly numbered cores belong to one NUMA
node, so I’m going to pin virtual CPUs to those as well. Because
my CPU is using Hyper-threading, half of the cores aren’t "real"
and are instead in HT pairs. We can dig out the information from
/proc/cpuinfo:
 grep -P "^(processor|physical|core id)" /proc/cpuinfo
processor       : 0
physical id     : 1
core id         : 0
processor       : 1
physical id     : 0
core id         : 0
processor       : 2
physical id     : 1
core id         : 1
# ...cut away some output...
processor       : 12
physical id     : 1
core id         : 0
processor       : 13
physical id     : 0
core id         : 0
processor       : 14
physical id     : 1
core id         : 1
# ...and so on..
Notice how the processor 0 and processor 12 have the same core id
(core in CPU) and physical id (CPU socket) pairs? The same applies to
processor pairs 2-14 and 1-13. To let guest OS run more efficiently,
I’m exposing that information to the VM. First <topology sockets='1' cores='4' threads='2'/> says, that VM will have one socket
with 4 cores having 2 threads ("hyper-threading" or
SMT) each.
This let’s VM know that some cores aren’t "real" and lets it
schedule tasks accordingly.
In QEMU the virtual CPUs form SMT pairs slightly differently than my Xeon does - they form pairs in order, so with my 8 virtual cores the SMT pairs look something like this:
| QEMU cores pairs | Xeon cores pairs |
|---|---|
| 0 - 1 | 0 - 12 |
| 2 - 3 | 2 - 14 |
| 4 - 5 | 4 - 16 |
| 6 - 7 | 6 - 18 |
This way the same four CPU cores with their SMT siblings on my real CPU form the SMT pairs in the VM. Because my CPU is 6-core, 12-thread model, I’m using the rest of the cores/threads for emulator and I/O threads. That way entire VM runs in same NUMA node on same CPU and plus it lets guest VM use SMT and CPU cache effectively.
Hugepages memory allocation🔗
<memory unit='KiB'>12582912</memory>

<memoryBacking>
  <hugepages/>
  <allocation mode='immediate'/>
</memoryBacking>
First the memory configuration is simply setting the allocated memory
to 12GB.
Then I’m setting the memory backing to hugepages. Allocation
mode is set to immediate, meaning the entire memory will be allocated
during VM start rather than allocating as needed. This makes sense
because I’m dedicating that chunk of memory to hugepages anyway
and there’s nothing else that can use it. If you want to
over-provision and possibly share the memory between multiple VMs
running at the same time, you can set the allocation to ondemand.
NUMA node memory tuning🔗
<numatune>
  <memory mode='strict' nodeset='0'/>
</numatune>

<cpu mode='host-passthrough' check='partial'>
  <topology sockets='1' cores='4' threads='2'/>
  <numa>
    <cell id='0' cpus='0-7' memory='12582912' unit='KiB'/>
  </numa>
</cpu>
First I tell QEMU to allocate memory in NUMA node 0. The mode is set
to strict - this means that VM will refuse to start if there’s
not enough memory to allocate in that NUMA node. This is not a concern
for me as I have the memory dedicated to VM. You can set it to
preferred if you’d rather start the VM with some memory in the
other NUMA node. (accepting possible performance hit)
And finally I’m telling QEMU to report back to host OS, that
there’s 12GB of memory in NUMA node (cell) 0 and that CPU cores
0-7 (so all cores) are part of that NUMA node. This is probably not
strictly necessary as in the absence of that setting guest OS
wouldn’t probably see any NUMA nodes at all and would behave as if
there was just single CPU, which would probably work just as well. If
your VM spans across multiple NUMA nodes, this would actually be the
place where you’d expose the NUMA mapping to the guest OS so it
can schedule tasks accordingly. (and for example avoid migrating tasks
to a CPU in different NUMA node)
Hyper-V enlightenments🔗
<features>
  <hyperv>
    <relaxed state='on'/>
    <vapic state='on'/>
    <spinlocks state='on' retries='8191'/>
  </hyperv>
</features>
<clock offset='localtime'>
  <timer name='hypervclock' present='yes'/>
</clock>
If you’re running Windows VM, this will let the guest use some Hyper-V API for better performance. (essentially doing some form of paravirtualization)
PCIe pass-through🔗
<devices>
  <hostdev mode='subsystem' type='pci' managed='yes'>
    <source>
      <address domain='0x0000' bus='0x06' slot='0x00' function='0x0'/>
    </source>
    <address type='pci' domain='0x0000' bus='0x00' slot='0x0b' function='0x0'/>
  </hostdev>
  <hostdev mode='subsystem' type='pci' managed='yes'>
    <source>
      <address domain='0x0000' bus='0x06' slot='0x00' function='0x1'/>
    </source>
    <address type='pci' domain='0x0000' bus='0x00' slot='0x0c' function='0x0'/>
  </hostdev>
</devices>
And finally the main reason for all of this. This will pass through the
two devices we’ve isolated earlier. Let’s quickly look at
the lspci output again:
IOMMU Group 17 06:00.0 VGA compatible controller [0300]: NVIDIA Corporation GP107 [GeForce GTX 1050] [10de:1c81] (rev a1)
IOMMU Group 17 06:00.1 Audio device [0403]: NVIDIA Corporation GP107GL High Definition Audio Controller [10de:0fb9] (rev a1)
Note the device locations 06:00.0 and 06:00.1 - bus, slot and
function attributes of the source devices need to match those.
Outro🔗
And that’s all folks! I’ve ended up with pretty capable (all things considered) gaming VM. It’s able to run many recent-ish games on playable framerate. (30+ FPS) and Steam streaming to my Raspberry Pi or other clients around the house works really well.
The main bottleneck right now seems to be the CPU. Some games (like Cities Skylines) have problem with that and drop to low 20 FPS. Xeon E5645 is pretty old CPU that’s mostly trying to be relatively energy efficient. It does not have huge single core performance and many games won’t be able to fully utilise the pretty low power GTX 1050 GPU just because of this fact. I plan to upgrade the CPU to slightly more powerful Xeon X5675. This one has about 50% higher single thread power, will report here later how that affects the gameplay.
Considering the gaming-related investment was essentially just the extra GPU (the rest of the server is used for other purposes as well) which amount to about €100, the whole setup works rather well and I’m quite pleased with it. Having said all that, from pure gaming perspective Dell R710 isn’t ideal HW. Just upgrading to newer generation R720 would provide much better experience and require no HW hacks. So keep that in mind if you’d like to build something similar.
This article is part of Linux category. Last 17 articles in the category:
- On dishwashers and Nix
- Look ma, no Hass!
- My favorite log aggregation service
- Sudo just a bit
- NixOS on Contabo
- Lenovo P500 remote management via serial port
- HTTP 500 - Very internal server error
- My favorite home lab metrics service
- LXC and the mystery of lost memory
- Docker in WSL2 (the right way ++)
You can also see all articles in Linux category or subscribe to the RSS feed for this category.