Lenovo P500 remote management via serial port
Outside of very specific deployments and industries, serial port on a modern hardware - if present - is usually overlooked and completely ignored. Over the years it became the floppy of external ports. These days one is more likely to see it as an icon representing I/O port than to physically use it.
Which is exactly why I also didn't see it for what it was - a simple, yet elegant solution to my particular problem. Because as it turns out, serial port still has much to offer even in 2023.
Motivation🔗
When Russian invasion of Ukraine started in 2022 and energy prices shot up, it became quite expensive to run my trusty old Dell R710 all year round 24/7. Effectively every W of power required to run a device constantly ends up costing about €3 per year, so for a server that runs at around 217W when mostly idle, that's over €600 per year:

There are couple major parts to this, but the biggest consumers were:
- Server chassis itself with dual
870WPSUs, multiple fans, RAID controller, that could get pretty hot, etc.. - Dual Xeon X5675 CPUs that were manufactured with pretty old 32nm lithography.
- Fully populated chassis with 3.5" HDDs - some of them enterprise grade
7200rpm.
I tackled all of the above by consolidating all the data down to 4 HDDs with higher capacity (and lower rpm) and by replacing R710 with Lenovo ThinkStation P500 Workstation. The biggest compromise being the workstation itself.
On the plus side:
- Price was reasonable (in my corner of EU) and I managed to source one for €230 + shipping. Newer generation of Dell servers wouldn't get anywhere near this price where I live.
- It still has ECC RAM support - this is one thing where I didn't want to compromise and that would push the price of any alternatives higher.
- There are 4 slots for 3.5" HDD, which is exactly how much I needed.
- Xeon E5-1650 v3 CPU has higher single core performance and only 20% less multi core performance compared to two X5675 I had before. Obviously it also has much lower idle consumption. (being couple generations newer) And there is upgrade path if I ever need more cores.
- Generally newer generation of almost everything. PCIe Gen
2.0→3.0,DDR3→DDR4RAM,.. - Proper full size PCIe slots. Fits regular size GPU, so no more workarounds required for my VFIO setup.
- P500 still has the enterprise feel to it - it has that "no tools" serviceability similar to R710.
- Unpopulated with drives and some expansion cards, the idle consumption sits somewhere just under
50W- less than 30% of R710 consumption or almost €400 saved annually at current prices.
On the other hand, there were a bunch of compromises:
- Single PSU - losing the sweet redundancy.
- Still a lot of proprietary parts not unlike Dell server.
- And the main thing - and topic of this post - no remote management access.
At first I didn't think I'd miss the - frankly quite terrible - Java interface iDRAC offered. I actually didn't use it that much over the years, but there are times when it was really handy and homelab just does not feel complete without some form of remote management that does not rely on host OS itself.
Using VMs and containers somewhat shifts the problem for guest systems as they can be managed quite comfortably via hypervisor or container tooling, but then there's the host. What to do? Connect screen and keyboard like a cave man?! 😦
Investigating options🔗
PiKVM🔗
This is very obvious and pretty popular solution and one that I actually planned to implement "at some stage in the future", but:
- Getting a Raspberry Pi these days is either expensive or requires a lot of waiting.
- Complete kits can be bought, but the price is same or even higher than second hand KVM products.
It is very neat product and it has many great features. But frankly, I don't need most of them, which makes the price element of the whole setup (unless one has Raspberry pi already) a bit less appealing. It is very cool project for sure, but maybe too much for my needs.
There is also one technical aspect that I'll leave for later. 😉
Second hand KVM solutions🔗
This is a mixed bag. There are solid products, that are still extremely pricy or it's a big rack mountable unit with non-negligible power consumption or both. With some search, one can get reasonably priced IP KVM at just under €100 shipped. The major downside is that a lot of these KVMs are super old which comes with questionable security (for always-on network connected device) and usually requires some prehistoric Java version on the client side. And unlike pretty common iDRAC where one can find client neatly packed in a Docker container, I'd be on my own maintaining some image with prehistoric version of everything to access these devices.
There is also one technical aspect that I'll leave for later. 😉
Serial port🔗
It took a while before I even thought about this option. In fact it was a bit of a coincidence - I was looking up some other setting in BIOS when I saw Console Redirection Settings. Which is how I realized, that my P500 actually has serial port and what's even better, this serial port can be used to access BIOS. 💡 Not only that, but I also happen to have Fujitsu Futro S720 lying around unused, that also has serial port. 🎉 You can already see where this is going. But there's also one technical aspect that I'll leave for later. 😉
Using serial port for remote management🔗
Client side🔗
Android as a client🔗
On it's own, this is actually quite easy. There are even apps for Android that can directly connect to serial port using USB OTG and some USB to serial adapter. If all you need is some sort of terminal, older android device and an adapter might be all you need.
There's even an option to share the serial connection as telnet session on your local LAN. This would seem like most ideal option, but none of the older devices I had could do OTG and charging over the same port. I would also have to handle the encryption somehow. But with some proper android device (like one of those media boxes with full size USB ports and ethernet) this would be quite good solution.
If you have some suitable device at home, you just need OTG adapter, some compatible USB to serial adapter (I had great success with PL2303 chipset) and a null modem or crossed over serial cable and you have your client sorted. I had to look further.
Old thin client as a client🔗
However as I mentioned, I have Fujitsu FUTRO S720. This can be easily bought online for about €30 + shipping. The only thing to watch out for is the storage (comes with 2GB as standard, which is quite tight for modern linux distributions, but certainly enough for more specialized systems) and the presence of power supply, which can cost additional €10 + shipping if not present - a non negligible portion of overall price.
What this gives us is low power (AMD GX-217GA APU has TDP of 15W, but at idle consumes less than that) PC with ethernet and serial port all packaged in a small passively cooled box. The CPU is way more powerful than we need, so this will sit idle most of the time somewhere at the 5W mark.
For the system, I went with minimal Ubuntu 22.04 install, because I already have tooling in place to keep it updated. But any distribution will do as long as there's SSH server and screen for serial access.
In Ubuntu the default owner of /dev/ttyS0 is root:dialout, so we can just add our user to the dialout group and with screen /dev/ttyS0 115200 we can start monitoring the port. (for those not familiar with screen, ctrl-A then k will kill the session) You can also use minicom or other software that might offer some extra functionality.
Server side🔗
Technically, there are three pieces to this puzzle where one needs to have a configuration in place to control the system and depending on your needs, you might only want to implement one or two of those:
- Early boot & BIOS
- Boot manager - for regular server systems most likely GRUB
- System OS itself
Let's start from the easiest top layer before diving deeper into the stack:
System OS serial access🔗
Linux kernel supports printing output over serial port. In fact, if there's no VGA card detected, it will default to serial output if such port is indeed available. Because we want to keep VGA output in addition to the serial interface, we need to add following kernel parameters:
console=ttyS0,115200 console=tty0This will set the output to both, so you can watch the boot log via attached monitor or serial port. It also sets the speed to maximum 115200 baudrate. (default being much slower 9600n8)
Let's set this in GRUB configuration by adding new file /etc/default/grub.d/99-serial-access.cfg with our settings:
# Linux serial interface setup:
GRUB_CMDLINE_LINUX_DEFAULT="${GRUB_CMDLINE_LINUX_DEFAULT} console=ttyS0,115200 console=tty0"The above file will preserve GRUB_CMDLINE_LINUX_DEFAULT options that some other file might have set and just adds serial configuration on top of that.
Then we can just run update-grub2 and on next reboot, we can watch boot log on the serial line. What's more, on modern systemd based distribution systemd detects that Linux is also putting output on serial and will automatically spawn getty for us on this port without any extra configuration. We can check the status of this service:
# systemctl status serial-getty@ttyS0.service
● serial-getty@ttyS0.service - Serial Getty on ttyS0
     Loaded: loaded (/lib/systemd/system/serial-getty@.service; enabled-runtime; vendor preset: enabled)
     Active: active (running) since Fri 2023-04-14 10:40:07 UTC; 15s ago
       Docs: man:agetty(8)
             man:systemd-getty-generator(8)
             http://0pointer.de/blog/projects/serial-console.html
   Main PID: 1511 (agetty)
      Tasks: 1 (limit: 1843)
     Memory: 216.0K
        CPU: 6ms
     CGroup: /system.slice/system-serial\x2dgetty.slice/serial-getty@ttyS0.service
             └─1511 /sbin/agetty -o "-p -- \\u" --keep-baud 115200,57600,38400,9600 ttyS0 vt220
As a result of that we get a login screen once the system has booted:
Ubuntu 22.04.2 LTS server ttyS0

server login:
We can now log in and manage the system via serial port. 🎆 This will come handy in case there's messed up network configuration or when ssh no longer works for some reason. Talking about ssh, Ubuntu 22.04 can automatically configure sshd to disable login with password if you configure ssh key during installation:
# cat /etc/ssh/sshd_config.d/50-cloud-init.conf
PasswordAuthentication no
If you don't have this set on your system, now might be the good time to do it - this way you only get much safer (and convenient) key-based access over SSH while you still preserve the option to remotely manage the server via serial port using the username and password. (and obviously via directly attached keyboard and mouse if needed)
GRUB serial access🔗
We already touched GRUB configuration above, but so far we only told host OS to listen on serial port, what if we also want to control GRUB itself before server OS even starts?
We need to extend our GRUB configuration to also tell it to show the boot menu on serial port:
# Linux serial interface setup:
GRUB_CMDLINE_LINUX_DEFAULT="${GRUB_CMDLINE_LINUX_DEFAULT} console=ttyS0,115200 console=tty0"
# GRUB serial interface setup:
GRUB_TIMEOUT_STYLE=menu
GRUB_TIMEOUT=10
GRUB_SERIAL_COMMAND="serial --unit=0 --speed=115200"
GRUB_TERMINAL="console serial"The above configuration will tell GRUB to:
- 5: Show boot menu - this is by default hidden in many distributions.
- 6: Set the timeout to 10s to give us a chance to interact with GRUB
- 7: Set the serial unit
0(first one) speed to115200 - 8: Set the GRUB terminal to be available both on display and on serial port
Save the changes, run yet another update-grub2, then reboot and voilà:
                             GNU GRUB  version 2.06

 +----------------------------------------------------------------------------+
 |*Ubuntu                                                                     |
 | Advanced options for Ubuntu                                                |
 |                                                                            |
 |                                                                            |
 |                                                                            |
 |                                                                            |
 +----------------------------------------------------------------------------+

      Use the ^ and v keys to select which entry is highlighted.
      Press enter to boot the selected OS, `e' to edit the commands
      before booting or `c' for a command-line.
Neat! We can now interact with GRUB remotely if needed. 💪
Also this setup so far does not require any special hardware, just having a serial port should be enough. Which might not be as exotic requirement as it might appear. Even current consumer motherboards that rarely have serial port among rear panel connectors usually have COM port headers and all you need is 9 pin serial to 10 pin motherboard header adapter to get an external access to it. Check manual from your motherboard, you might be surprised. 📓
And for most that would be good enough. But we can go even further.
BIOS serial access🔗
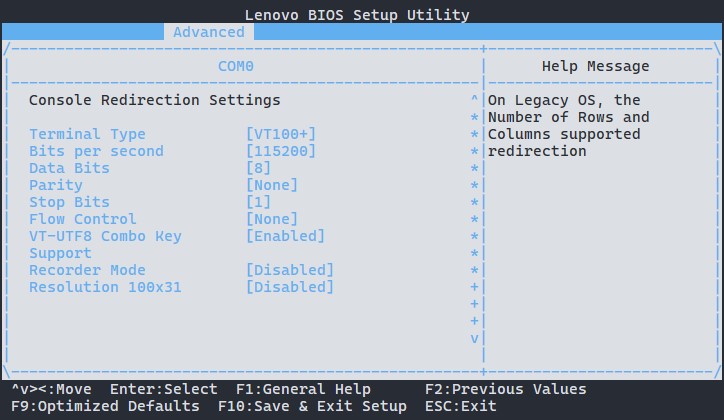
Note that this needs actual HW support for management over serial interface, there's just no way around it. I'd also suggest actually looking around in BIOS directly - I haven't found any mention of this functionality in otherwise quite extensive user manual for P500.
For obvious reasons this part is very specific to my HW and unless you have similar hardware running similar version of BIOS, your configuration might look different.
For anyone with ThinkStation P500, the interesting bit is in Advanced → Serial Port Console redirection where COM0 is the external serial port. Besides enabling the console redirection, changing speed to 115200 and terminal type to VT100+ everything can be left as is:
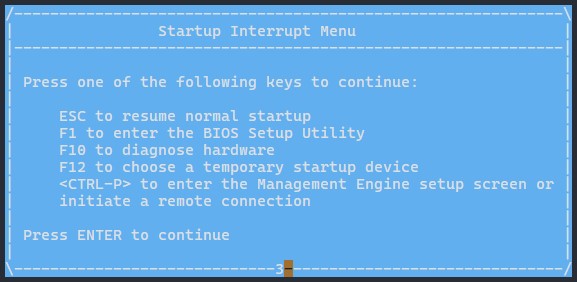
Then F10 to Save & Exit Setup and after couple seconds of furiously pressing Enter startup menu appears over serial connection:
🎉 Success!
As a quality of life improvement I go to BIOS once again and in Startup settings configure the boot prompt to use F1 for entering BIOS, F12 to show boot menu, etc.. The default is to first open the Startup Interrupt Menu with Enter, but this does not work well with GRUB where the same key confirms boot of selected system. This could lead to situation where I could press it a bit too late and instead of entering BIOS, start booting the OS which is likely very much the thing I definitely didn't want to do.
In all honesty from all this setup this is the clunkiest part and there are some rough edges suggesting that the whole redirection was implemented as an afterthought rather than first class functionality:
- I haven't found any setting that would force the initial power on prompt to display in text mode. What that means is that the
Press F1 to enter settings..prompt is only ever displayed with lovely Lenovo logo on attached display. On serial console there's just black screen and one has to know to start pressing the interrupt key. - After GRUB shows, it appears that BIOS console redirection messes up with serial connection a bit and pressing any key drops me to GRUB command line. Returning back to the menu (for example by typing in
normal) goes back to fully functional GRUB menu, so it's just little inconvenience. I have not experienced this issue with system that did not have console redirection enabled.
Overall it's still very usable, but it is quite a big contrast to the higher level counterparts where the serial connection works flawlessly. Perhaps thanks to many eyes that got to look at and work on those specific parts of software compared to in-house development of "enterprise" BIOS. It reminds me of this quote from one of Bryan's great talks:
Firmware is just Software that's historically hard to get to. -- Bryan Cantrill
And it is a bit of a shame, that this firmware layer ended up being the weakest link as there isn't much I can do about it other than get used to the rough edges.
That one technical aspect that I left for later🔗
Oh I almost forgot! There was another reason why I didn't want to do "real" KVM. My specific issue was, that ideally the only GPU in the system is the GPU I normally pass through to a VM. Plugging an KVM to it makes the GPU believe there's this weird monitor attached and it somewhat limits my ability to select specific resolutions inside the GPU accelerated VM.
For this reason there was another low power GPU in my system that could have screen attached to access BIOS and console as I was setting up the server and if I went down the KVM route, I'd have to keep it there. But now that I can manage my server over the serial port, I could remove that other GPU completely.
Looking at GPU specs, this actually saved more power than the newly deployed thin client is consuming. A nice little perk of this setup.
Final thoughts🔗
Sure, it's not "proper" KVM. It does not have mass storage drive emulation, ATX power control, it can't even do graphical interface. But it does remote management and does it reasonably well. It does not require special web interface or some ancient version of Java. 👉 It allows copy-paste of text, which is sometimes more than the professional stuff can do.
As long as you have the serial connection anywhere on your motherboard, just by adding 5 lines of GRUB configuration you too can have server, that's manageable over serial port from the moment GRUB loads all the way up to the system shell. You can add those lines now and worry about the client side later.
If you can source old Android with USB OTG, or a thin client with serial port - anything that can plug to your network on one side and to the serial port on the other, you can have remote management on very tight budget.
Honestly, there's almost no reason not to do this.
This article is part of Linux category. Last 17 articles in the category:
- On dishwashers and Nix
- Look ma, no Hass!
- My favorite log aggregation service
- Sudo just a bit
- NixOS on Contabo
- HTTP 500 - Very internal server error
- My favorite home lab metrics service
- LXC and the mystery of lost memory
- Docker in WSL2 (the right way ++)
You can also see all articles in Linux category or subscribe to the RSS feed for this category.